How a Hand-Welted Shoe Is Made — What Each Stage Actually Does
Follow traditional hand-welted shoemaking from pattern and upper preparation to hand inseaming, outsole attachment, finishing and repair considerations.
A traditional hand-welted shoe is built around a structural insole, an upper shaped over a last, and a leather welt sewn into that assembly by hand. The outsole is attached to the welt in a separate operation. Understanding those two connections makes the process easier to follow than a claim about how many hours or steps the shoe takes.
This guide follows the main stages from pattern and leather selection to the finished pair. It describes traditional construction rather than promising that every maker uses the same materials, tools or sequence. For a specific Handsole shoe, its product description and confirmed construction remain the authority.
1. Establish the shape and prepare the upper
The last gives the making process its three-dimensional reference
The last is the form around which the shoe is shaped. It establishes the intended forepart, heel, instep and toe geometry, along with the relationship to the planned sole and heel. A last is not simply a model of the wearer’s bare foot: it must account for the design and the space and shape needed in the finished shoe.
Pattern work translates that form into pieces of upper and lining. The pattern maker considers joins, openings and allowances for assembly and lasting. An Oxford, Derby and loafer can require different arrangements even when their overall silhouettes appear similar. A change to an opening or seam can therefore affect more than decoration.
Crockett & Jones separates pattern work and lasting within its production overview. Its process is Goodyear welted, so it is useful here for shared stages rather than evidence of hand welting. For a focused explanation of the form itself, read what a shoe last does.
Clicking selects and cuts suitable leather pieces
Clicking is the cutting stage for the upper and lining components. The cutter inspects the leather and places patterns so visible marks or unsuitable areas do not fall where they would undermine the intended result. Cutting efficiently matters, but obtaining two appropriate sets of pieces matters too.
Crockett & Jones documents leather inspection and both hand and press-knife cutting in its clicking-room explanation. The important distinction is between the cutting tool and the judgment behind placement. A press-cut piece is not automatically poorly selected; a hand-cut piece is not automatically well selected.
For a customer, useful questions are whether the upper material is named and whether its finish matches the intended appearance. A dramatic cutting photograph cannot establish the specification of every pair. The leather clicking guide explores that stage in more detail.
Closing turns the pieces into an upper
Closing joins the prepared sections, adding relevant stitching, edge treatments, openings and fittings. Some designs also require brogue punching or an apron seam. The lining and upper must be assembled in the intended relationship so that the next stage shapes a coherent unit rather than loose individual parts.
In its closing-room account, Crockett & Jones shows that hand and machine operations can coexist in upper work. A hand-welted shoe can have machine-stitched upper seams. The term hand welted identifies the welt connection; it does not assert that every visible stitch in the shoe was made manually.
Look at seam placement, alignment and the intended design when examining a completed upper. Small natural variation is different from an obvious mismatch that changes the pattern’s appearance. Ask for clarification about a particular feature rather than using one broad handmade label to explain away every irregularity.
2. Prepare the insole and shape the shoe on the last
The structural insole is part of the build
In this construction, the insole is more than a removable comfort insert. It provides a structural base beneath the foot and an anchoring area for the inseam. In the traditional method described here, the maker prepares a holdfast from the leather insole so the welt connection can be sewn through it.
Josh Leong’s hand-welted construction explanation describes this carved insole anchoring structure. That is a specific construction fact; it does not establish the exact thickness or preparation used by another workshop. Those details should come from the actual maker.
Do not confuse the structural insole with the sock liner that may cover it inside the shoe. An interior photograph may show the liner while hiding the structure underneath. Our sock liner, insole and insert guide separates those terms.
Lasting gives the upper its intended form
During lasting, the upper is drawn over the last and secured for subsequent work. In a traditional build, toe and heel stiffening components can sit between upper and lining. The maker must bring these layers into their intended position while shaping the leather around the form.
Carreducker’s first-hand shoemaking course account documents insole preparation, lasting with stiffeners and toe puffs, and then hand welting. It gives a useful view of the sequence without making that training schedule a universal production timetable.
The customer-facing significance is shape and consistency. A neat final silhouette depends on decisions made before polishing. Yet appearance alone cannot confirm that the last will fit your foot. Even carefully executed lasting reproduces the intended form, which still needs to be suitable for the wearer. See hand lasting explained for the dedicated topic.
Preparation needs checking before it is concealed
Once the bottom is assembled, some earlier work becomes difficult for a customer to inspect. That makes in-process checks valuable: confirming the intended upper, size and configuration before moving on can prevent an error from being discovered only after the pair is finished.
This is also why a final shine is an incomplete quality signal. It can make a well-built shoe attractive, but it cannot tell you everything about hidden preparation. When a maker explains its process, look for clear descriptions of the components and connections rather than only photographs of the finishing bench.
3. Hand inseam the welt, then build the sole connection
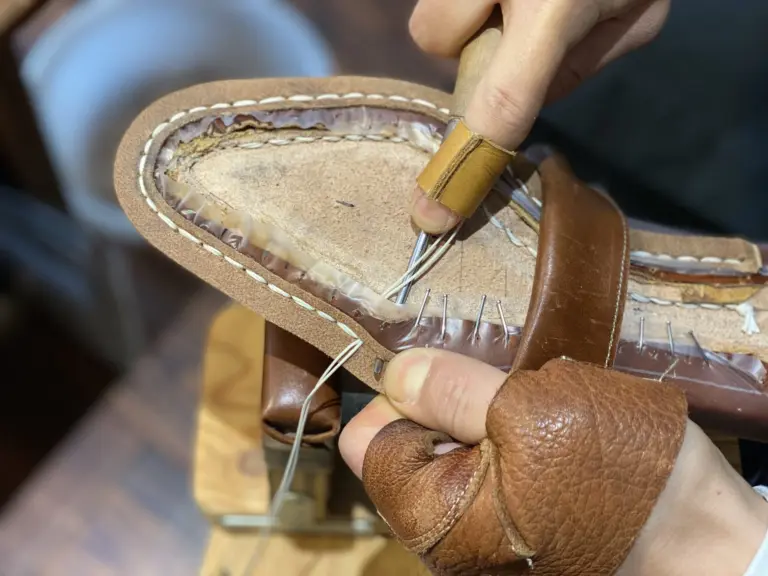
Hand welting creates the first structural connection
The welt is a strip around the relevant perimeter of the shoe. Hand inseaming connects it to the lasted upper assembly through the prepared insole holdfast. This is the defining manual sewing operation in the hand-welted method. The welt will then provide the attachment area for the outsole.
The underside of the finished shoe normally does not expose this connection directly. Its visible outsole stitch is a different seam. A Reddit question about identifying hand-welted and Goodyear-welted shoes captures that common confusion. It is a consumer question here; the maker documentation supports the technical distinction.
For an explanation of the actual connection, read inseaming explained. For comparing construction options, use hand welting versus Goodyear welting. This article follows the making sequence rather than attempting to rank every method.
The insole anchoring method is not identical in every welted shoe
Conventional modern Goodyear-welted shoes commonly use attached ribbing associated with the insole and a machine-sewn welt connection. But there are variations. Viberg documents a channeled-insole Goodyear method that differs from the familiar glued-on-rib example.
That exception matters when reading broad comparisons. “Welted” does not, on its own, tell you the inseaming tool or the insole anchoring arrangement. “Hand lasted” also does not mean “hand welted.” Ask which operation was performed by hand when a description combines several making terms.
Bottom preparation creates a base for the outsole
After the welt connection, the maker prepares the underside for the next layers. The remaining space and waist area may require filling and support components appropriate to the build. Cork is one possible filling material, but it should not be assumed to appear in every hand-welted shoe.
A trainee’s first-hand record of filling and sole work illustrates how leveling the bottom and positioning the outsole are separate tasks. It is one documented making exercise, not a complete recipe for every workshop. The practical aim is a prepared foundation for the next attachment, with materials chosen for that construction.
A shank can form part of the waist support arrangement. Its material and configuration need model-specific confirmation. Do not translate the presence of a shank into a medical claim or a promise that a shoe will meet everyone’s support needs. The shoe shank guide explains the component separately.
Outsole stitching is the second connection
The outsole is positioned and attached to the welt rather than being the seam that defines hand inseaming. The maker may sew this outsole connection by hand or use a machine, according to the construction and workshop practice. Therefore, hand welted and hand-stitched outsole are separate claims.
Loake documents sole-to-welt stitching in its shoemaking operations account. Its production method should not be confused with a fully manual build, but the explanation helps distinguish the outsole connection from the earlier welt connection. A customer can ask about both without requiring the seller to use ambiguous terms.
| Connection | What it joins in the method described | What to ask the maker |
|---|---|---|
| Hand inseam | Welt, upper assembly and prepared insole holdfast | Is the welt sewn by hand, and how is the insole prepared? |
| Outsole seam | Outsole and welt | Is the outsole stitched by hand or machine, and how is the channel finished? |
4. Complete the heel, sole edges and finish
Open and closed channels change what you see
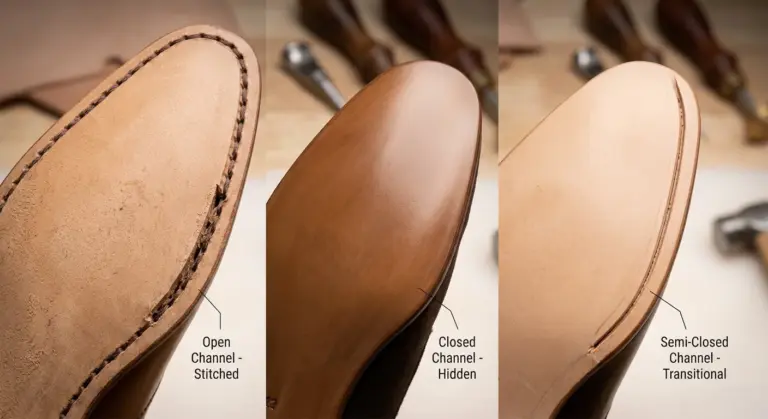
An open sole channel leaves the stitch line visible in a groove. A closed channel conceals the stitching beneath a flap of outsole leather after it is closed. The absence of visible stitching underneath is consequently not proof that the sole was only glued.
Carreducker’s sole-stitching course account describes closing channels and reshaping edges after sewing. Josh Leong also identifies a closed channel as a separate feature of its shoes. Neither account makes a concealed channel a requirement for all hand-welted footwear.
Choose a channel treatment as part of the actual specification. A clean underside can be attractive, but appearance should not replace a clear description of the attachment method. The open and closed channel guide covers this finishing distinction in detail.
The heel and edge need their own assessment
In a built-heel design, the heel is assembled and shaped to the intended profile, then finished with the appropriate top piece. Other designs may use different heel components. Hand welting does not itself specify the heel material, height or method of building it.
For a buyer, inspect the heel from the rear and side as well as the forepart. The pair should reflect the intended silhouette, with edges finished consistently and no unexplained damage or separation. A decorative waist or particularly sharp edge is a design choice, not a substitute for assessing the whole shoe.
Loake’s operations account separates trimming from staining and polishing the sole edges. That distinction is useful: finishing refines a prepared shape rather than creating the underlying construction from nothing. Read sole edge finishing and dress shoe heel anatomy if you want to inspect those features more closely.
Upper finishing follows the material and intended appearance
A finish may involve cleaning, color work, burnishing, polish or other material-appropriate operations. A highly reflective black shoe and a deliberately varied patina need different visual judgments. Suede should not be assessed by the same shine standard as smooth polished leather.
Ask which appearance is intentional. Shade variation in a patina can be part of the design; an unexplained difference from the ordered material deserves clarification. Do not infer the complete making method from a dramatic polishing video. Equally, do not assume a restrained finish means less structural work was done.
Process descriptions are most useful when they connect an operation to a named component. “The welt is hand inseamed” is more informative than an unqualified handmade claim. Our guide to what handmade means examines the broader language without treating machine use as automatically incompatible with skilled work.
5. Interpret craftsmanship, timing and repair claims as a customer
Hand welting is a construction choice, not a fit guarantee
A carefully made hand-welted shoe can still be the wrong size or shape for a particular person. Construction describes how the shoe is assembled; fitting requires the right last, dimensions and pattern for the foot. Resolve both questions rather than assuming a labor-intensive method automatically provides a comfortable result.
Likewise, the method does not establish waterproofing, certified traction or a guaranteed lifespan. Those claims need their own evidence and specifications. A shoe for occasional indoor wear faces different conditions from a daily wet-weather commuter. Think about the complete product and use, not only its welt.
Production time is different from active bench time
Elapsed production time can include preparation, work on several components, material-specific waiting periods, finishing and inspection. A count of working days is not the same thing as the number of hours one person continuously works on a pair. A maker’s operation count can also reflect how it groups tasks rather than a universal measure of craftsmanship.
When ordering, ask for the current production estimate and expected dispatch timing for your actual configuration. Then account for shipping and any deadline separately. Do not turn another maker’s course schedule, factory lead time or bench demonstration into a promise about Handsole delivery.
The specific-date ordering guide helps frame those questions. Any additional customization needs its scope and timing confirmed. Hand welting does not mean a personal last, unlimited alterations or bespoke fitting is automatically included.
Repairability depends on the shoe’s condition and service route
A welted outsole connection can support replacing a worn outsole without discarding the entire upper, but actual repair depends on the state of the shoe and the available expertise. The welt, insole, upper and heel need assessment. Ask the maker or a suitably experienced repairer rather than assuming unlimited future resoles.
Request advice before wear damages additional layers. The resoling guide describes signs that justify a repair assessment. If you want a different replacement sole, confirm compatibility and likely changes to profile or feel before commissioning the work.
Use the process to ask better buying questions
Confirm the upper and lining materials, last and fit guidance, insole arrangement, precise welt method, outsole attachment and repair route. You do not need to memorize every tool or stitch to make an informed purchase. You need clear answers about the components that matter for your intended use.
Read Handsole’s craft information for the broader approach, then return to the particular product’s specification. The construction overview connects hand welting to the other major methods. A useful craft explanation gives you a clearer picture of the pair you are buying and the questions still worth asking.