How to Measure Your Feet for Shoes — A Step-by-Step Sizing Guide
Learn how to measure your foot length, ball width, toe girth, waist, instep and heel correctly before ordering leather shoes—and why both feet, width and last shape matter.
Measure both feet, record them separately, then compare size, width and last.
You probably know your shoe size.
But do you know your actual foot measurements?
That distinction matters when you are ordering leather shoes, particularly when the shoe is made after you place the order.
A US size tells us approximately how long a shoe needs to be. It does not fully describe your forefoot width, instep, heel, overall foot volume or the difference between your left and right feet.
For a better starting point, measure the feet themselves.
Then combine those measurements with the shoe’s US size, width and last rather than trying to solve every fit issue by moving up or down one size.
Before choosing a pair, compare the different Handsole last shapes and widths in the Sizing & Fit Guide.
What you need before measuring
You do not need specialist equipment.
Prepare:
- two sheets of paper large enough for your feet
- a pencil or fine marker
- a ruler or measuring tape
- a soft tailor’s measuring tape for girth measurements
- the type of socks you normally expect to wear with the shoes
Measure on a hard, level floor rather than carpet.
And measure while standing.
Your foot changes shape when it carries your body weight, so a seated measurement does not represent the foot in quite the same way.
Whenever possible, have someone else take the measurements while you stand naturally.
The Brannock Device Company’s professional fitting instructions also call for measuring while the customer is standing and for checking both feet separately.
Measure both feet
Do not measure one foot and assume the other is identical.
Small differences between left and right feet are common.
Record both feet separately.
For a normal standard-size decision, the larger foot will usually be the more important reference. But do not throw away the smaller-foot measurements.
If the difference is significant, tell us before the pair enters production.
Handsole’s Custom Made process allows unusual left/right fit requirements to be reviewed before the build begins.
Start by tracing your feet
Place the paper on the floor.
Stand on it wearing the socks you normally expect to wear with the shoes.
Keep your weight distributed naturally rather than leaning away from the foot being measured.
Have someone trace around the foot while keeping the pencil as upright as practical.
Repeat the process for the other foot.
Do not deliberately draw extra space around the toes.
The tracing should represent the foot—not the amount of room you think the shoe needs.
The last already provides the shoe’s three-dimensional shape and appropriate allowance beyond the actual foot.
A — Measure foot length
Measure from the back of the heel to the end of the longest toe.
Do not automatically assume the big toe is the longest. For some people, the second toe extends farther.
Measure in a straight line.
Record the result for both feet in centimeters.
For example:
Left: 27.1 cm
Right: 27.4 cm
Do not round aggressively because you are trying to make the number match the shoe size you normally buy.
Your usual size is useful context.
Your measurement is separate evidence.
B — Measure ball width
Next, measure across the widest part of the forefoot.
This generally runs across the ball of the foot around the major toe joints.
Again, record each foot separately.
Ball width is particularly important when a shoe feels correct in length but consistently presses across the forefoot.
This is where customers sometimes make the mistake of buying a longer shoe to gain room.
If the length is already correct, a different width may be the more appropriate comparison.
Handsole uses D, E, EE and EEE width options where offered. Read Shoe Widths Explained before deciding that a longer size is the answer.
Use this measurement diagram
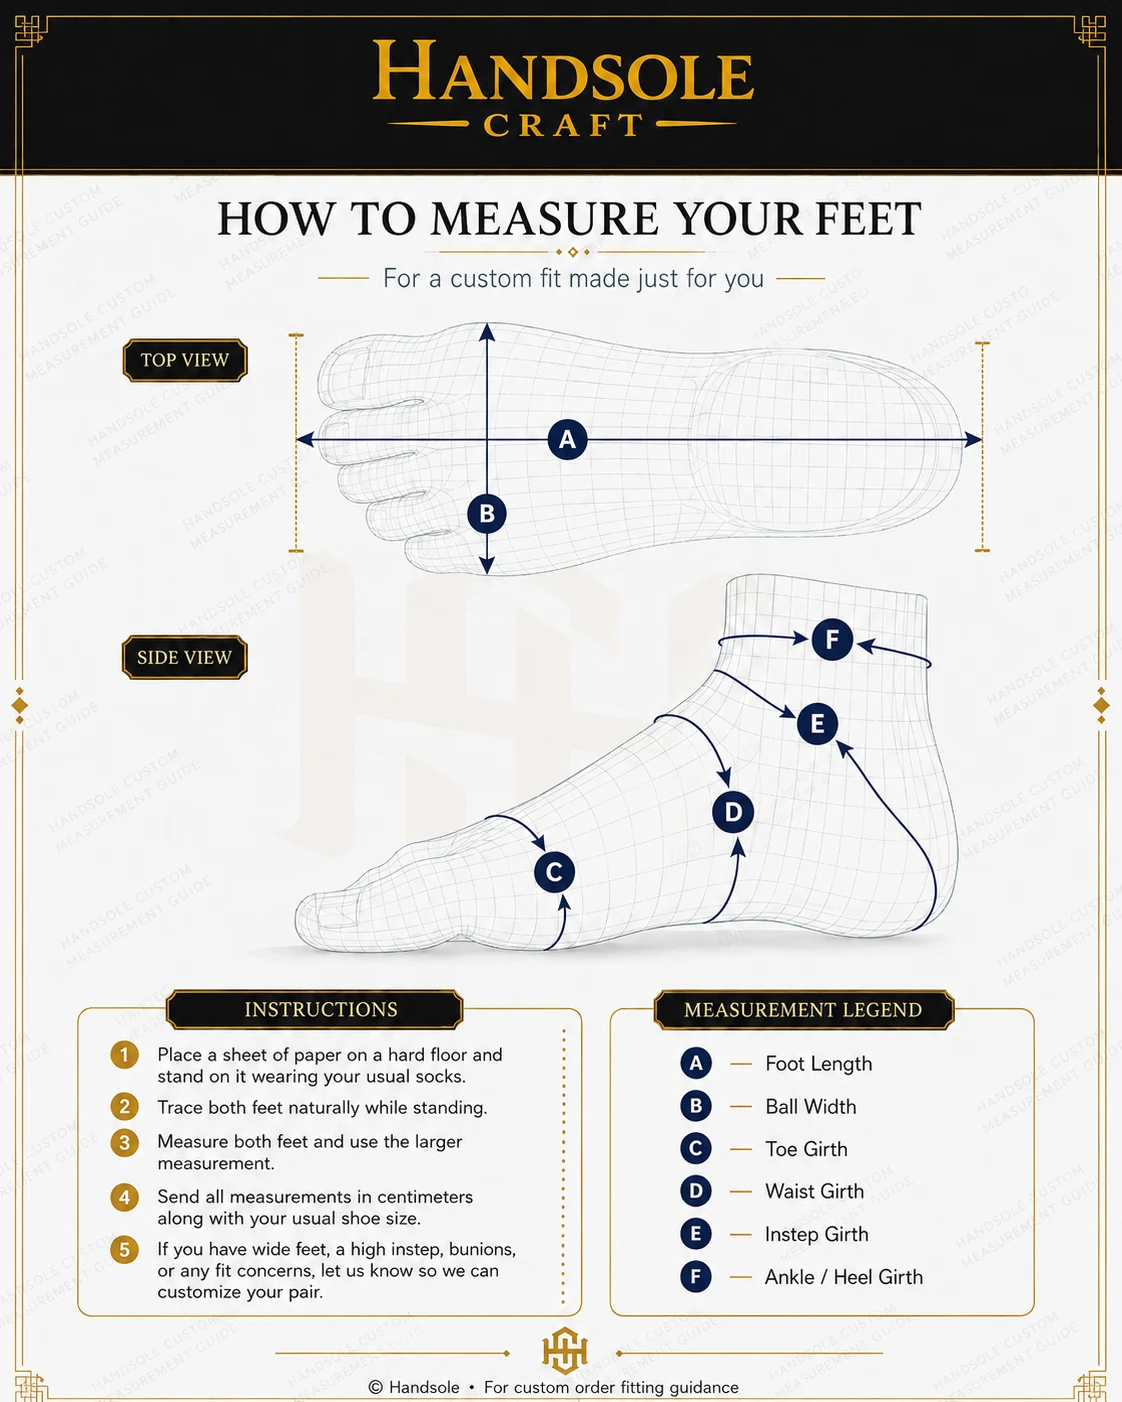
The Handsole measurement guide shows the six measurements we may use when more detailed fit information is needed:
A — Foot Length
B — Ball Width
C — Toe Girth
D — Waist Girth
E — Instep Girth
F — Ankle / Heel Girth
For many standard purchases, length and width information combined with your normal shoe history may be enough to guide the starting point.
For a more unusual fit requirement or Custom Made request, the additional girth measurements give us a much better picture of the foot’s volume.
C — Measure toe girth
Switch from the flat ruler measurement to a soft tape.
Wrap the tape around the forefoot near the toe-joint area shown in the guide.
The tape should follow the shape of the foot.
It should be snug but not tight.
Do not pull the tape deeply into the skin, and do not deliberately leave it loose.
You are trying to record the circumference of the foot—not create additional allowance.
Record left and right separately.
D — Measure waist girth
The waist is the narrower middle region of the foot behind the ball.
Wrap the tape around the area shown in the measurement guide.
This gives additional information about the amount of volume through the middle of the foot.
It is useful because two feet with a similar length and forefoot width can still have noticeably different overall volume.
E — Measure instep girth
The instep is especially important in structured leather footwear.
Wrap the tape around the foot at the instep position shown in the guide, passing beneath the foot to create a complete circumference.
Again, keep the tape comfortably against the foot without compressing it.
A high instep can create pressure even when the nominal length and width appear reasonable.
And this is why simply choosing a wider shoe does not solve every instep problem.
Width and instep volume are related, but they are not the same measurement.
F — Measure ankle and heel girth
For more involved fitting, measure around the heel and ankle area as indicated in the guide.
This helps describe the rear-foot volume.
Heel fit is often misunderstood.
If a heel moves inside a shoe, customers sometimes immediately size down.
But heel movement can involve several things:
- incorrect length
- excess width
- instep volume
- heel geometry
- topline shape
- the underlying shoe last
That is why a fit problem should be diagnosed by where it occurs, not solved automatically by changing the size number.
Measurements do not directly equal shoe dimensions
This is important.
If your foot measures 27.4 cm long, you should not expect the inside of the correct shoe to measure exactly 27.4 cm.
Shoes need appropriate allowance.
Different last shapes also distribute that allowance differently.
An elongated almond-toe shoe may have visible space beyond the toes that is part of the design.
A rounder last may distribute the front volume differently.
So your tracing should describe your foot accurately.
Do not add your own extra centimeter because you think the shoe needs space.
Choosing the correct shoe geometry is the job of the sizing and last system.
Do not choose shoe size from length alone
Foot length is important.
It is not the entire fit.
Two customers can have the same foot length but very different:
- forefoot widths
- toe shapes
- instep heights
- overall volumes
- heel dimensions
Professional shoe-fitting guidance makes the same point. Brannock measures heel-to-ball as well as heel-to-toe length because the relationship between the ball of the foot and the shoe’s flex point matters.
That is why Handsole combines US size, width and last.
If you have not already read it, What Is a Shoe Last? explains why the last can make two shoes in the same marked size feel completely different.
The Pedorthic Footcare Association’s fitting guidance similarly recommends matching the widest part of the foot with the widest part of the shoe rather than relying only on the labeled size.
Measure width instead of automatically sizing up
One of the most common sizing mistakes is increasing shoe length to solve a width problem.
Imagine your toes are positioned appropriately in a US 9, but the shoe feels tight around the ball of your foot.
Moving to US 10 may add some space.
But it also moves the entire shoe forward and changes the relationship between your heel, flex point and toe position.
If length was not the original problem, the larger shoe may introduce new problems.
This is why Handsole offers multiple widths.
When the length appears appropriate but the forefoot needs additional room, compare width before automatically adding length.
Tell us about your current shoes too
Measurements become more useful when combined with your actual footwear history.
If you already own a well-fitting leather shoe, tell us:
- brand
- model if known
- marked US size
- marked width
- where it feels good
- where it feels tight or loose
Likewise, if a particular shoe consistently creates problems, tell us where the problem occurs.
“US 10 usually fits me” is useful.
“US 10 D usually fits in length, but feels tight across the ball” is much more useful.
What if one foot is larger?
Use both measurements.
Do not hide the difference.
If the difference is small, selecting around the larger foot may provide the most practical standard starting point.
If the difference is meaningful, especially in length, width or overall volume, contact Handsole before production.
Do not automatically buy an oversized pair just to accommodate one measurement.
A fit review can determine whether a standard configuration is still appropriate or whether the request belongs in Custom Made.
What if you have a high instep or a prominent area?
Tell us where the problem occurs.
A high instep is not simply another word for a wide foot.
You can have an average forefoot width and still need more volume over the instep.
Likewise, a localized prominence cannot be described fully by one overall width number.
If you are ordering through Custom Made, include that information before the leather is cut.
Handsole can discuss footwear fit and available room, but footwear guidance is not medical diagnosis or treatment.
Common measuring mistakes
Measuring while sitting
Standing gives a better representation of the loaded foot.
Measuring only one foot
You may be using the smaller foot as your reference without realizing it.
Pulling the measuring tape too tight
This understates girth.
The tape should follow the foot, not compress it.
Adding extra room to the tracing
Trace the foot accurately.
The shoe’s last already accounts for the difference between a foot and a finished shoe.
Assuming your sneaker size transfers directly
Sneakers, dress shoes and different brands can use different sizing systems and lasts.
Your existing size is a reference, not a conversion formula.
Buying longer because a shoe feels narrow
Identify whether the problem is actually length, width, instep volume or last geometry first.
Expecting leather to fix the wrong measurement
Leather can soften and adapt with wear.
It should not be expected to correct an obviously inappropriate size, width or last.
What measurements should you send Handsole?
For a straightforward fit question, start with:
1. Your usual US shoe size
2. Left foot length
3. Right foot length
4. Left ball width
5. Right ball width
6. The Handsole design you are considering
For a more involved fit review, add:
7. Toe girth
8. Waist girth
9. Instep girth
10. Heel / ankle girth
And tell us about:
- high instep
- unusually broad forefoot
- left/right differences
- repeated heel slip
- localized pressure points
- previous fit problems
More measurements are useful only when they are accurate.
Do not invent precision.
What happens after you measure?
Your measurements do not create a shoe recommendation by themselves.
They help narrow three decisions:
US size
Does your measured length support the size you normally wear?
Width
Does the forefoot need standard, roomier, wide or extra-wide space?
Last
Which underlying shoe geometry better matches the shape and volume of your foot?
Start with the Sizing & Fit Guide and the product’s own fit notes.
If the standard product configuration works, order normally.
If your measurements reveal a requirement that the product page does not cover, use Custom Made before production.
Common questions
Should I measure my feet barefoot?
Measure in the type of socks you expect to wear with the shoes unless the specific product instructions tell you otherwise.
Should I use my larger foot?
Measure and record both. The larger foot is usually important when selecting a standard size, but meaningful asymmetry should be reviewed rather than hidden.
Should I trace around my foot or measure directly?
The tracing is useful for overall shape and length. A ruler and soft tape then give you the actual measurements.
How tight should the tape be?
It should sit against the foot without compressing the skin.
Are foot length and shoe length the same?
No. The shoe needs additional internal allowance, and different lasts distribute that space differently.
Can foot measurements tell me my exact shoe size?
They are an important input, but not the only one. Your normal fit history, width, last geometry and the individual product all matter.
What if I am between sizes?
Do not automatically choose up or down without considering width and last. Compare the product fit guidance and contact Handsole before production if the decision remains unclear.
Measure the foot first. Then choose the shoe.
A shoe size is a label.
Your foot is three-dimensional.
Start with accurate measurements of both feet. Understand whether the issue is length, width, volume or shape. Then compare those measurements with the shoe’s actual width and last.
That gives you a much better starting point than ordering a familiar number and hoping every shoe fits the same.
And if the measurements tell us that your requirements fall outside the normal product configuration, we would rather know before the shoe is made.